Are you thinking of building your community on Discord?
Discord is more than hanging out and chatting. It’s a versatile platform for building communities, whether you’re into Midjourney, web3 gaming, or just looking for a place to build a community.
Like me, you might have explored Discord in various ways. Now, you are considering taking the next step and creating your very own server 🚀
You’re in the right place buddy.
In this guide, I’ll show you how to create a Discord server, plus some handy tips to get you started.
Ready to begin?
Let’s take the first step together.
I partner with awesome companies that offer products that help my readers achieve their goals! If you purchase through my partner links, I get paid for the referral at no additional cost! For more information, visit my disclosure page.
Key Takeaways
- Easy Setup: Learn the simple steps to create your Discord server, from account creation to server setup.
- Customization Tips: Discover how to personalize your server with unique names, custom settings, and engaging bots.
- Community Building: Find out how to attract and manage members, creating a vibrant and active community.
- Safety and Moderation: Understand the importance of maintaining a safe environment with effective moderation tools.
- Monetization Strategies: Explore ways to monetize your server through premium features and subscriptions.
What is a Discord server?
A Discord server is like your own special online meeting place. You can chat, share ideas, or just hang out, all through text and voice messages.
It’s popular among gamers, students, and companies who want to connect with their audience.
Discord has become a popular platform for building communities due to its user-friendly features and live chat options in text and voice channels. Creating a dedicated Discord server with a private channel for any topic is easy with the Discord app on every device.
Some well-known examples of Discord servers include Roblox and Jack in the Box’s Late Night server, which uses various channels for different topics and discussions.
As you will find out, setting up your server is not as complex as it appears.
What can you use a Discord server for?
Discord servers can serve a variety of purposes.
You can create one to connect with friends and hang out.
Build a community around your hobbies or interests.
Promote your brand to potential customers.
NFT projects.
Gaming guild.
So much more…
With its real-time chat capabilities, Discord is a favorite destination for gamers, but that’s not all it’s good for.
Of course, no platform is perfect, and Discord has limitations, such as difficulty monetizing your group and the potential for chaos in large servers.
However, many of these issues can be mitigated by properly organizing your server and setting up custom channels to keep things tidy.
How to Create a Discord Server: Step-by-Step Guide
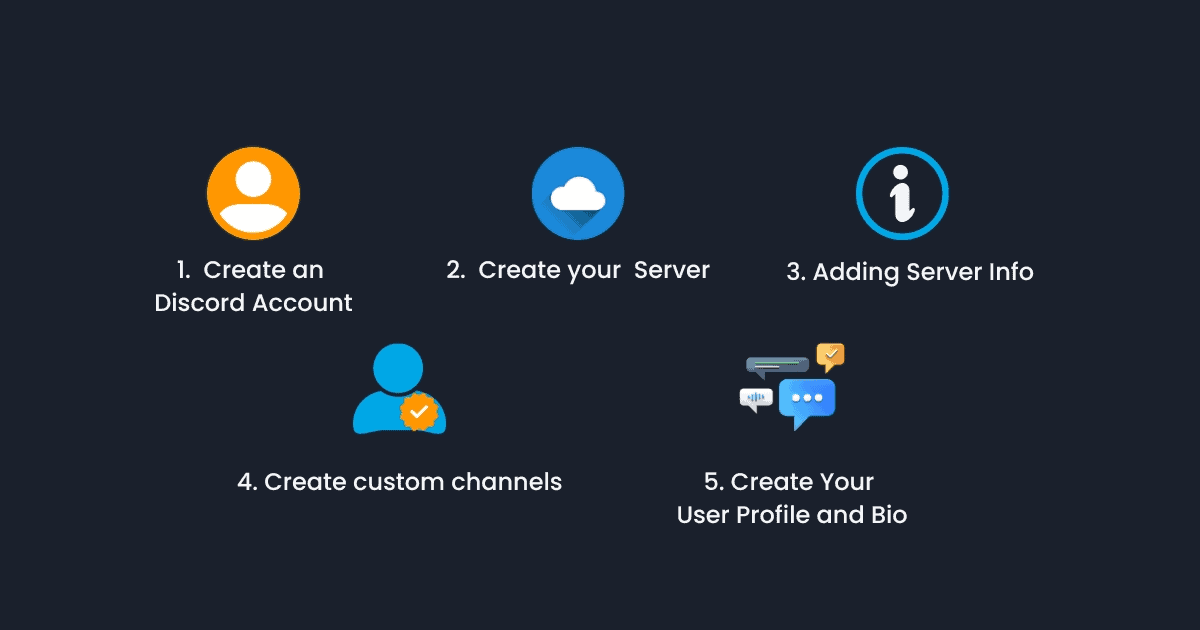
Creating a Discord server is an easy process.
This guide will take you through the steps, from setting up your account to adding customized channels for your server.
1. Create a Discord account
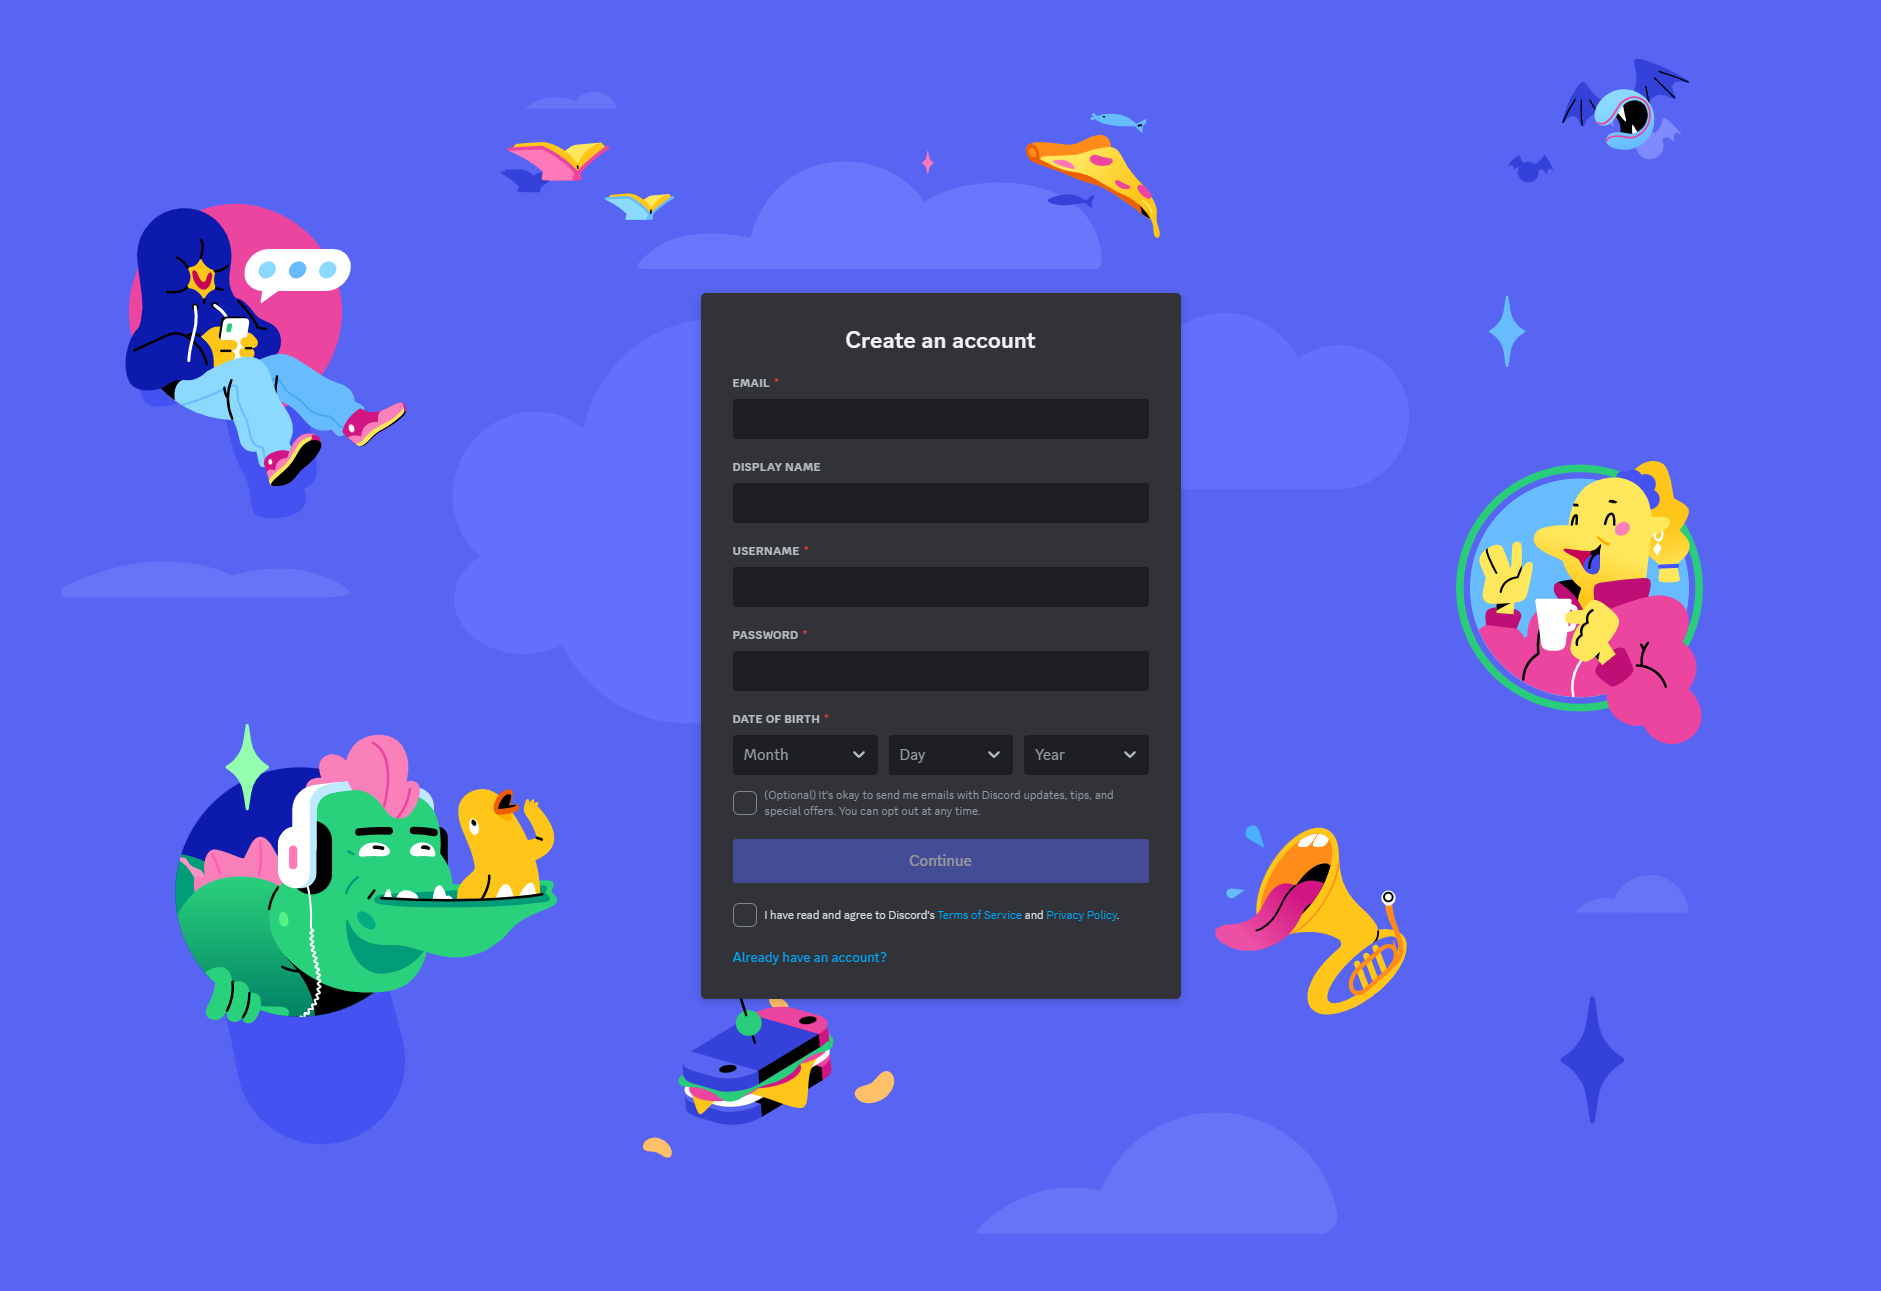
The first thing you need to do is create a Discord account.
To sign up, provide an email, username, password, and date of birth.
It’s as easy as creating a Gmail account.
Once your account is set up, you might need to agree to a code of conduct, answer a few quick questions, or wait for a moderator’s approval before joining a public server again.
These steps ensure that everyone on the server adheres to the same guidelines and maintains a safe, welcoming environment.
2. Create Your Server
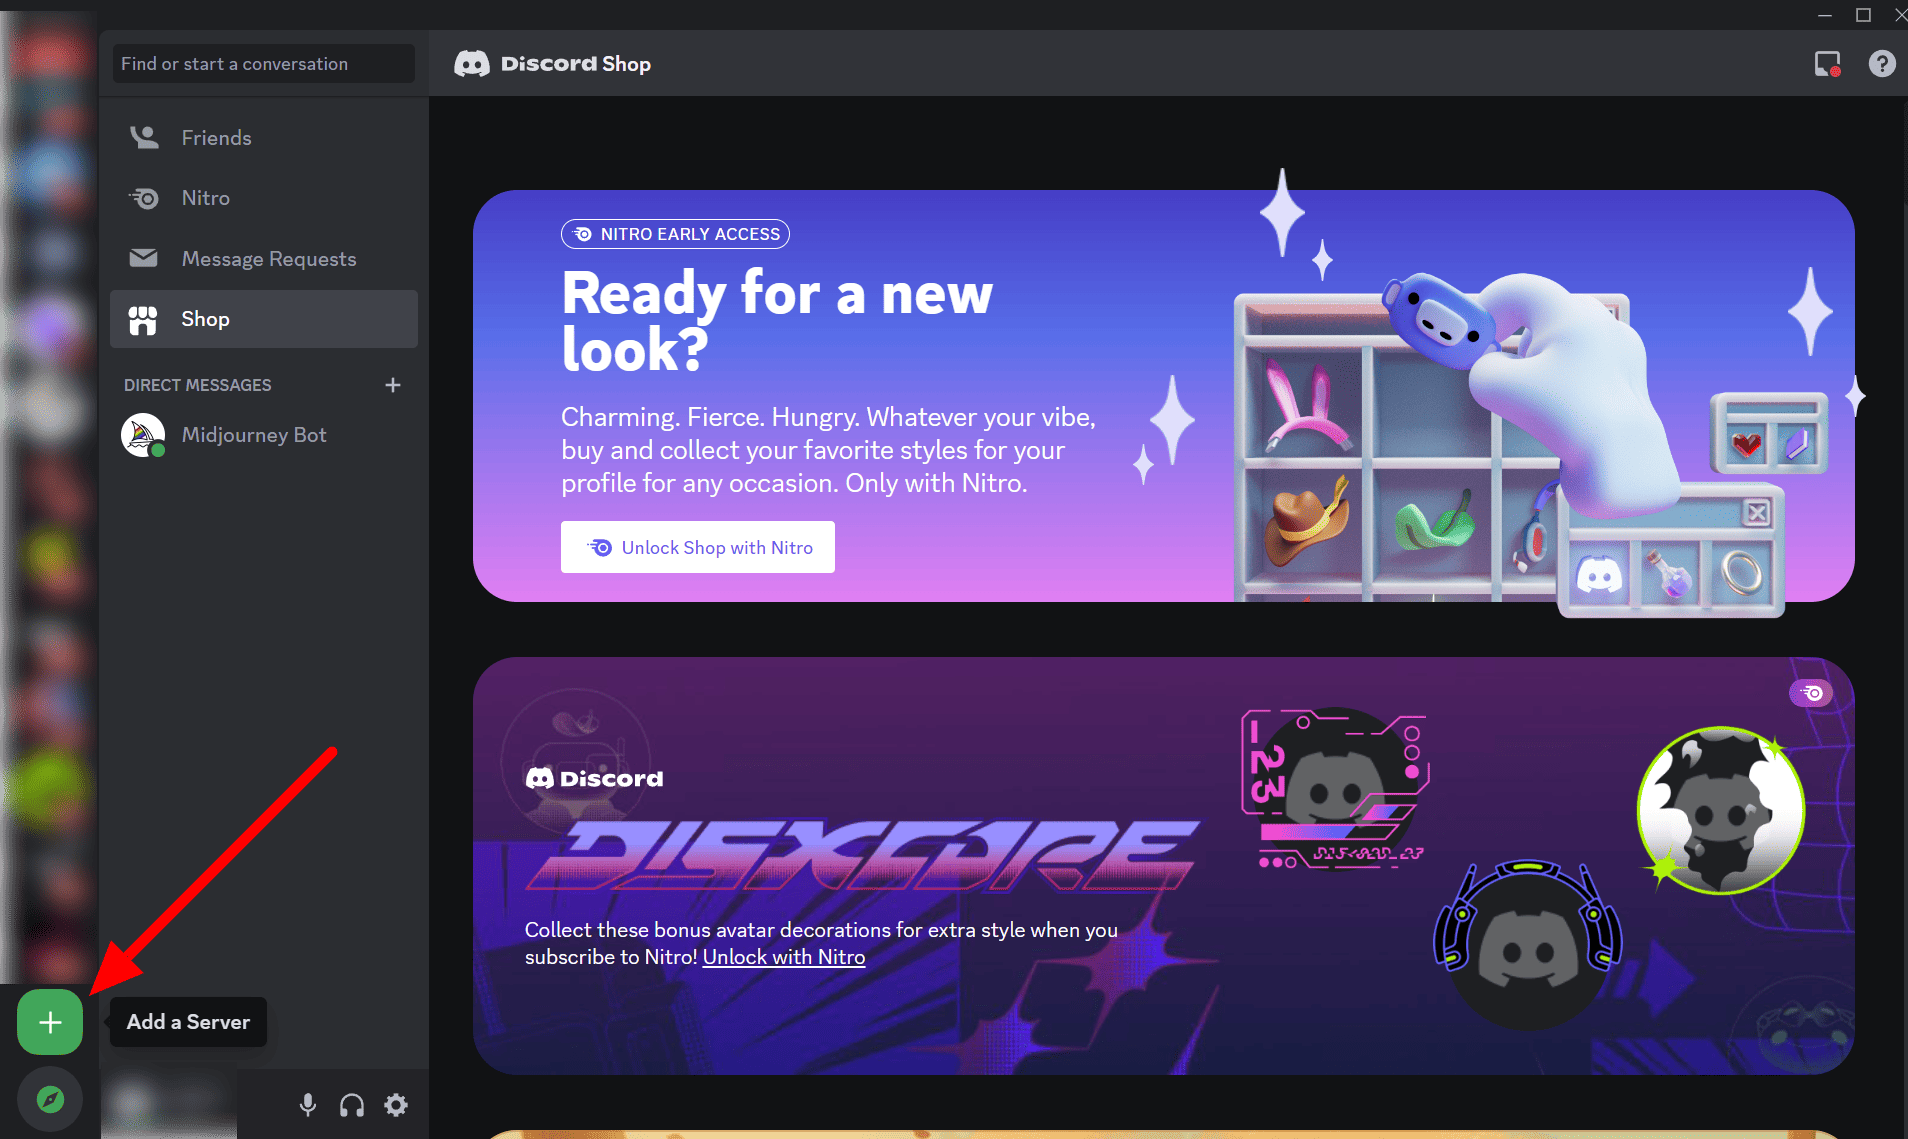
Once logged into your Discord account, click the “+” icon on the left-side corner of the menu bar to “Add a Server.”
You’ll have the option to select a server template or start from scratch.
Some popular templates include:
Gaming servers
Text-based roleplay servers
Streamer or community servers
Bot support servers
Aesthetic servers
Creator servers
It all depends on the purpose of the server.
Next is to choose your name.
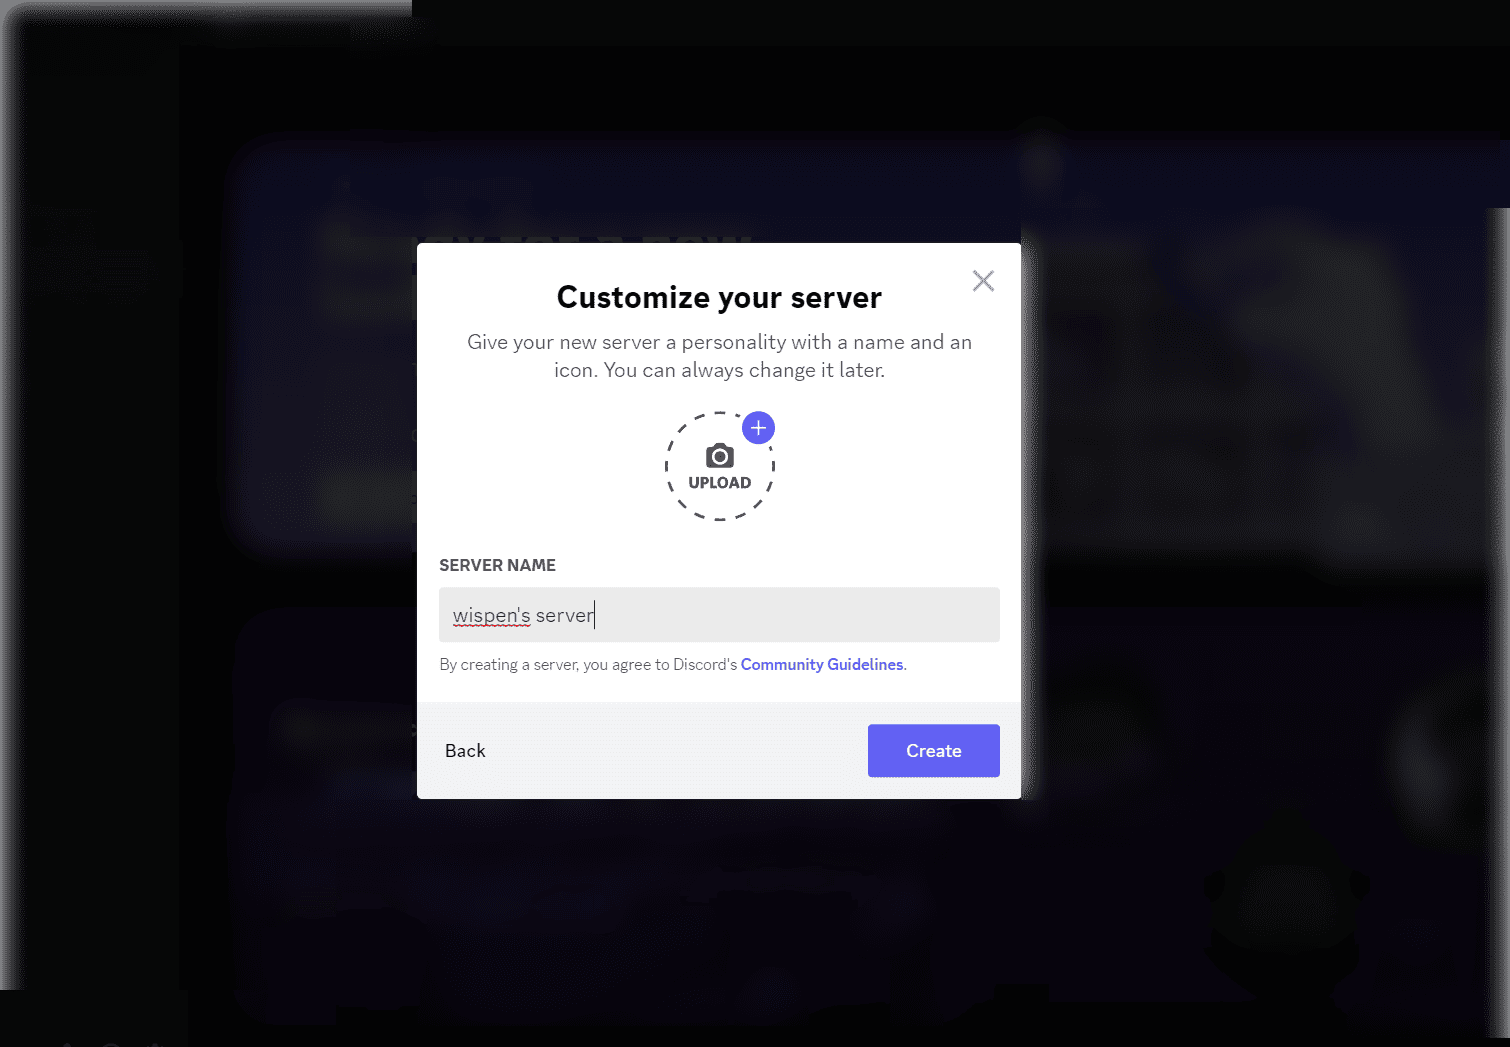
When naming your server, consider the following tips:
Make it match the server’s topic or purpose
Keep it short and memorable
Use unique fonts or symbols
Add “Community” if it fits
The goal is to make your server name creative and one-of-a-kind.
Customizing Server Settings
Once a template is chosen, it’s time to tailor your server settings.
This includes adjusting permissions and roles and adding bots and integrations to enhance user experience and interaction.
Customizing server settings helps create a more personalized and engaging environment for your users, ensuring that your server stands out on the platform.
3. Adding Server Info
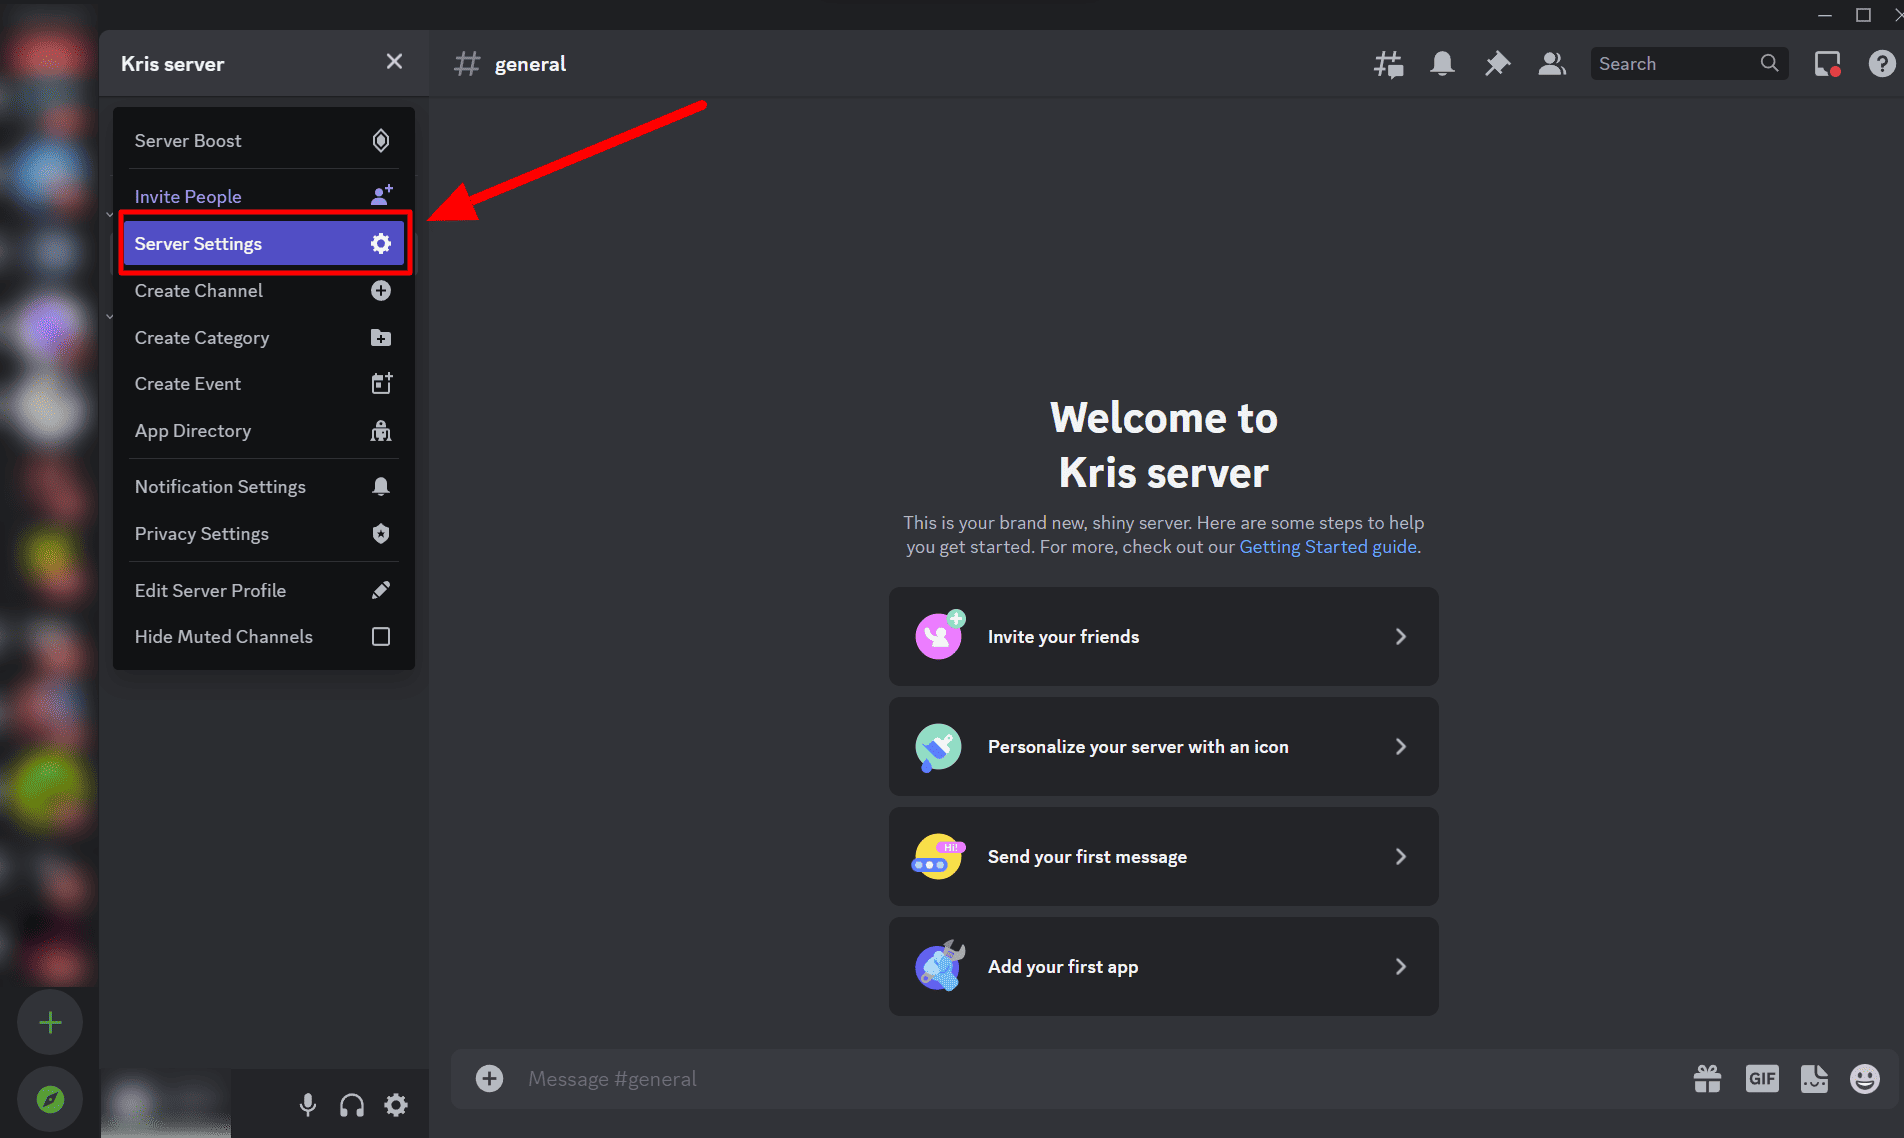
After creating your server, it’s time to add some server info and customize the settings.
Your members need to know what kind of server you have.
The Settings page allows you to:
Set up auto-welcome messages
Upload custom emojis
Manage user roles and memberships
Manage bans
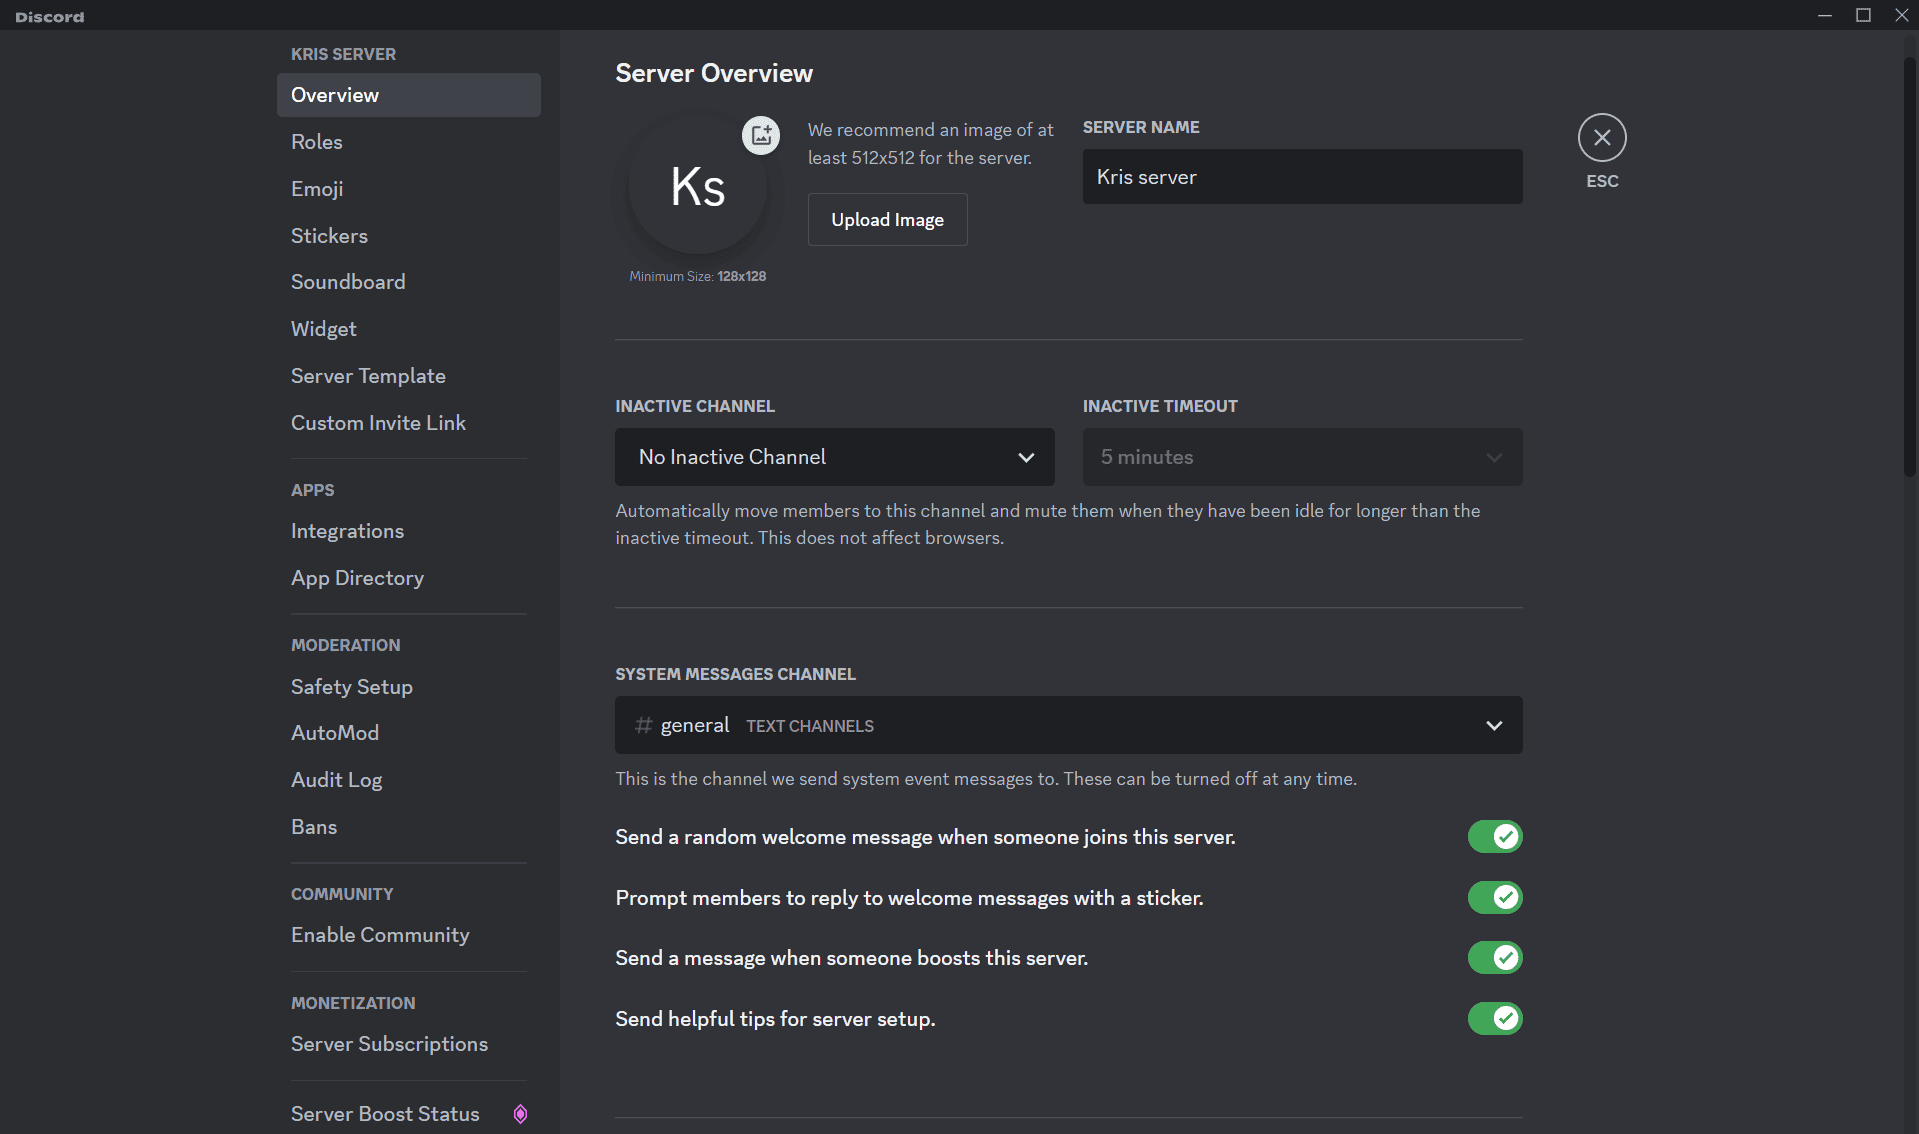
You can also create a welcome screen to greet new members. It will provide invite members with an overview of the server and guide them to appropriate channels.
4. Create custom channels on your new Discord server
Creating custom channels is essential to keep your server organized.
Custom channels can only be designed for different topics and channel-specific permissions, allowing for a more streamlined user experience.
To create a channel, follow these steps:
Right-click on the channel name and select “Edit Channel” from the dropdown menu.
Click the gear icon near the channel’s name for more customization options.
Change the name permissions or add a channel header as desired.
Controlling permissions for custom channels is necessary to guarantee an uninterrupted experience for all users.
To manage permissions, follow these steps.
Proper organization of custom channels helps to maintain a clean, user-friendly environment for your community.
5. Establish Your User Profile and Bio
A well-crafted user profile and bio can help you stand out in the Discord community and attract like-minded users.
To personalize your profile, include your name, age, location, interests, hobbies, and favorite games in your bio.
You can also adjust your privacy by going to your settings, tapping “Privacy and Safety,” and enabling or disabling the options you want.
For example, if you’re a freelance writer, you could mention your expertise, favorite writing topics, and any published works in your bio.
This will make it easier for other users to connect with you and showcase your unique personality and skills to potential clients or collaborators on the platform.
Structuring Your Server: Channels and Permissions
A properly organized server is necessary to promote a positive user experience and keep your community orderly and active.
In this section, we’ll explore the process of organizing channels and permissions for various topics and user roles, providing a seamless experience for your community members.
Design Voice Channels for Real-Time Chat
Voice channels allow real-time voice chat and can be customized for different purposes and permissions.
To create a voice channel, follow these steps:
Click the “+” button next to voice channels in the sidebar.
Choose “voice channel”.
Name the channel.
Hit “create”.
Customizing voice channels ensures that your users have a space to connect and engage with each other in real time, fostering a sense of community and camaraderie.
Organize Text Channels for Various Topics
Text channels are integral to any Discord server, and new channels should be organized by topic to ensure a smooth user experience.
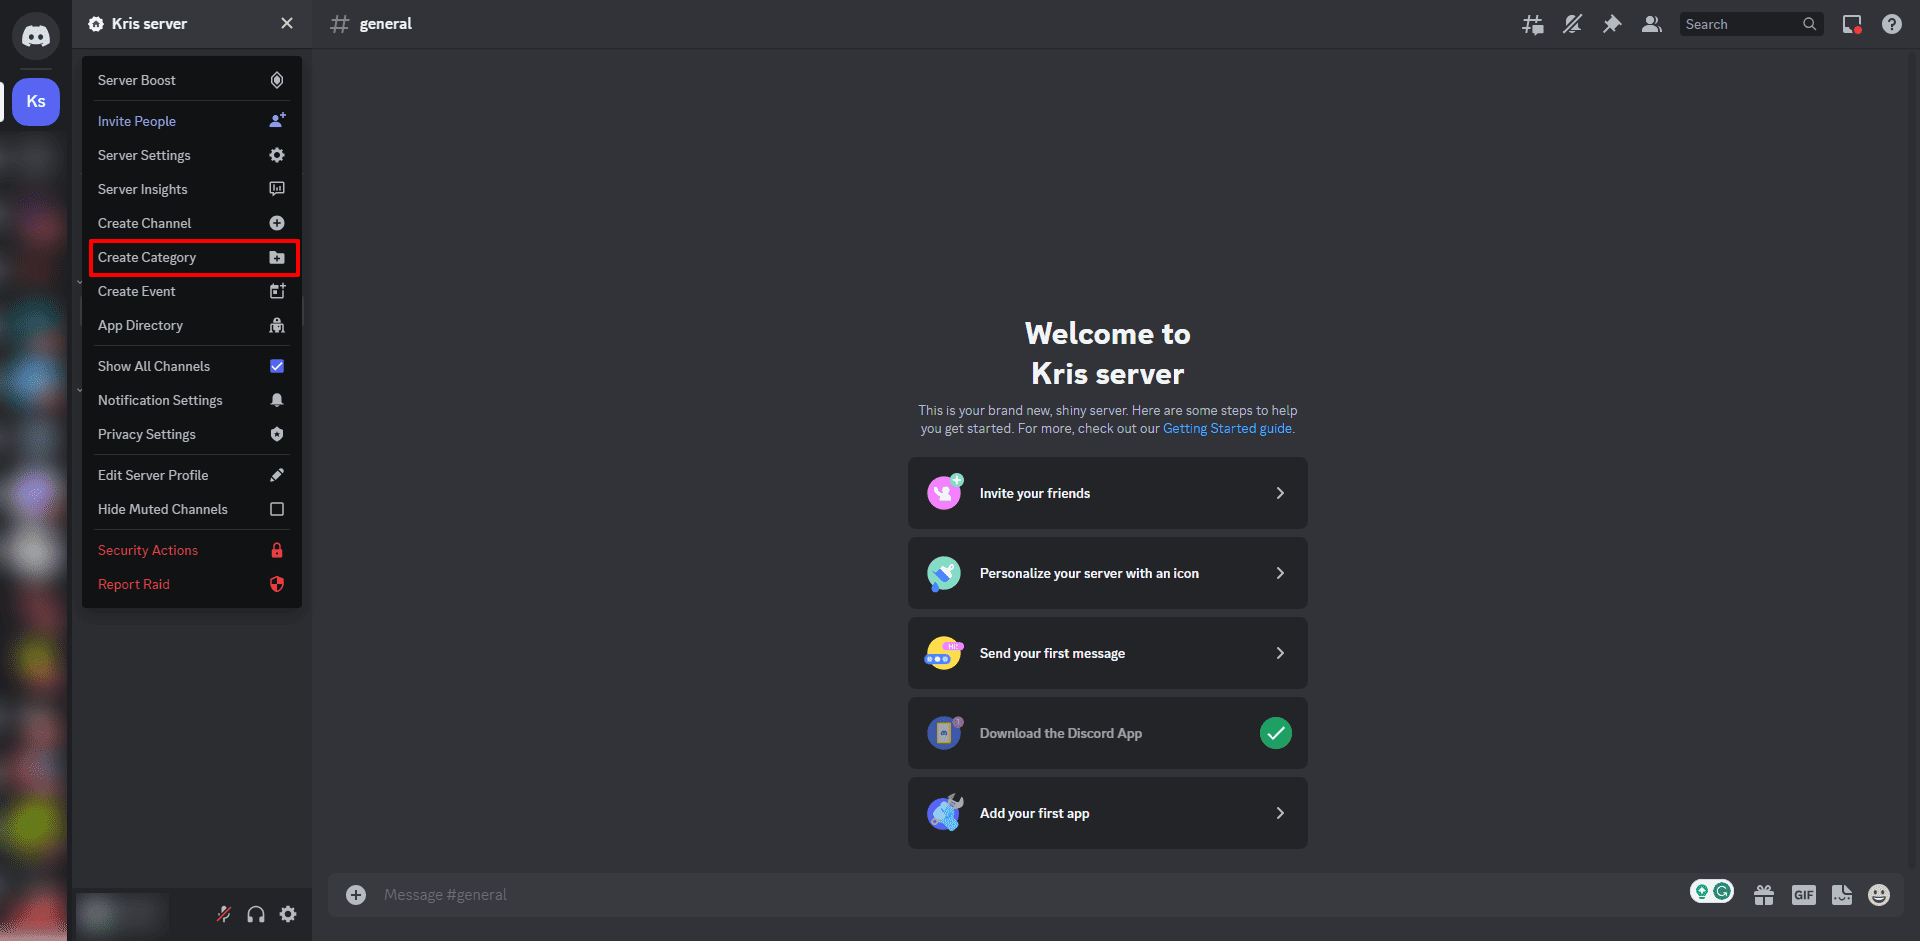
To manage your text channels, follow these steps:
Right-click your server icon or click the chevron next to the server name.
Add a new category.
Drag and drop the text channels into the appropriate categories.
By organizing your text channels, users can easily find and engage in conversations relevant to their interests, making your server more appealing and user-friendly.
Some examples of well-organized text channels are:
General or Chit-Chat
Welcome
Introductions
Bot
Interest-based channels
Announcements
Memes
Inviting Your Tribe: Growing the Discord Community
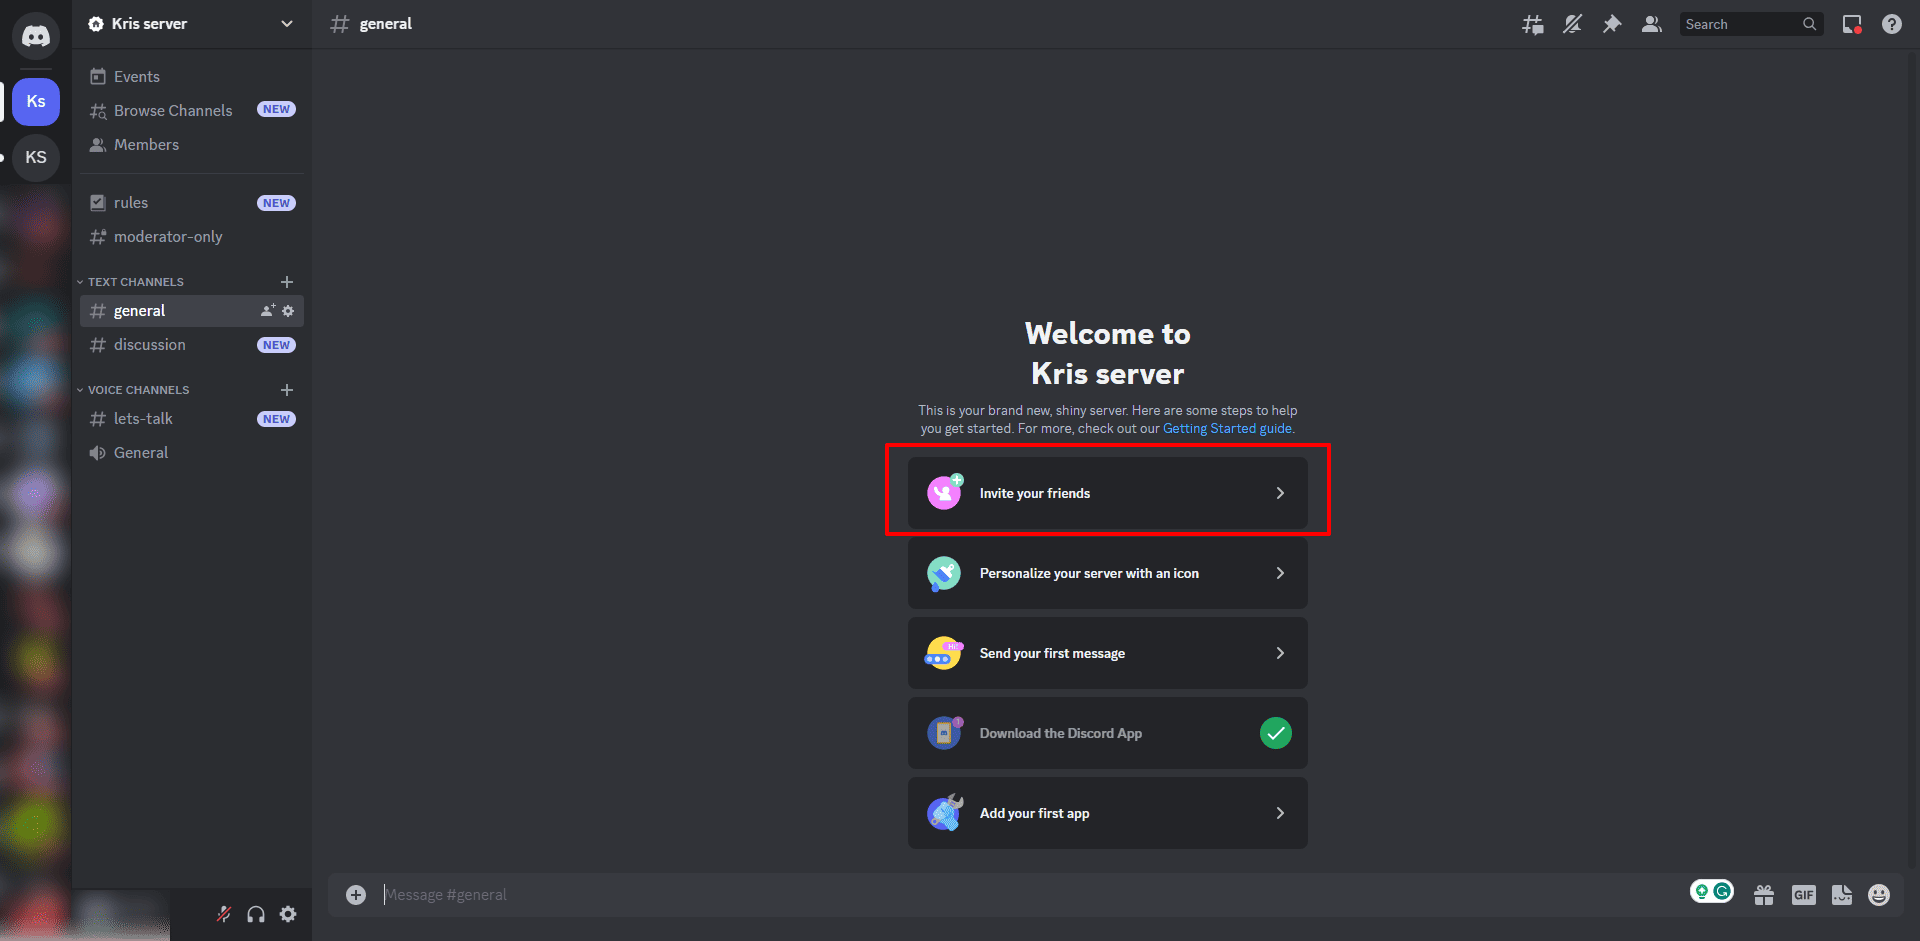
Expanding your Discord community requires member invitations, server promotion, and offering to join incentives. When inviting people, ensure they align with your server’s interests and will benefit from being part of your community.
Share your invite link with friends or post it on social media to invite people to spread the word.
You can also offer exclusive content, discounts, or rewards for joining your Discord community.
By providing value and fostering a sense of community and belonging, you’ll attract more users and create a thriving community that stands out.
How to manage the members on your new Discord server
Controlling members on your Discord server is vital for upholding a secure and friendly environment.
This includes:
Assigning roles.
Moderating content.
Ensuring everyone follows the server’s rules and guidelines.
In the next section, we’ll explore the importance of maintaining a safe and welcoming environment on your server.
Personalizing the Experience: Bots and Integrations
You can customize the Discord experience by incorporating bots and integrations for improved interaction and connection.
Bots can automate tasks, moderate content, and provide additional features for users, while integrations can connect Discord with other platforms for seamless content sharing.
Let’s explore how to enhance your server with bots and integrations.
Enhance Interaction with Bots
Bots can greatly improve user interaction on a Discord server by responding to commands, monitoring chats for specific keywords, and triggering actions.
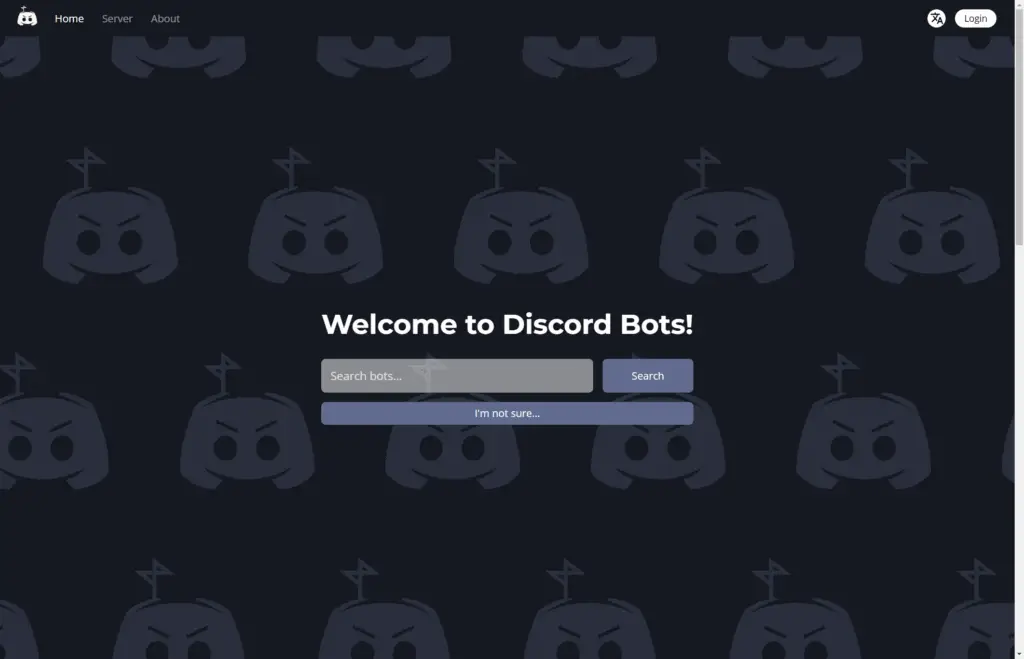
Some of the top bots for Discord servers are MEE6, Dyno Bot, Tatsu, Carl-bot, Groovy, and Dank Memer.
Adding bots to your server can enhance the overall user experience and automate responses, saving time and effort for your community members.
Connect with Other Platforms
Integrations allow you to connect Discord with other platforms, such as:
Gmail
Google Calendar
Google Drive
Trello
Asana
LINE
Crunchyroll
By integrating other platforms with Discord, you can streamline communication and enable community collaboration, making it easier for users to access content and engage with your community.
For example, integrating Twitch with Discord lets streamers chat and connect with their subscribers on their Discord server, while viewers can join and chat with their favorite streamers on their servers.
Similarly, linking YouTube and Discord enables better communication, content sharing, and collaborative viewing experiences.
Integrations help you create a more connected and engaging environment for your users.
Monetizing Your Server: Premium Features and Subscriptions
You can monetize your server by providing premium features subscriptions and using Discord’s Nitro and Boost options.
Nitro is a paid upgrade that allows users to customize their profile and boost servers, while Boosts are in-game purchases that anyone can contribute to a server.
By offering premium features and subscriptions, you can generate revenue from your Discord server and invest in its growth and development.
Nitro and Boost options allow you to monetize your server while providing additional user advantages.
Maintaining a Safe and Welcoming Environment
Upholding a secure and friendly environment on your Discord channel or server is key to promoting a positive community atmosphere.
Setting clear rules, moderating content, and ensuring that all users adhere to the same guidelines helps to create a harmonious environment where everyone feels valued and respected.
To keep your server safe, consider taking the following steps:
Use moderation bots like Spectre to assist your moderators
Ensure that your moderators are trustworthy and reliable
Actively moderate conversations
Set clear guidelines for content creation
Review and approve or remove user-generated content as needed
By taking these steps, you can ensure that your community server remains a positive and supportive space for all members.
Final Thoughts
And there you have it! You’re now equipped with all the know-how to launch your very own Discord server.
From setting up your account to customizing channels and managing members, you’ve learned it all. Remember, your Discord server is more than just a digital space—a vibrant community waiting to happen.
So, why wait?
Dive in, start building, and watch as your unique space on Discord comes to life, buzzing with conversations and connections. Whether it’s for gaming, hobbies, or just for fun, your server is your realm.
So take the leap, and watch your server transform into a thriving hub of engagement and fun.
The world of Discord awaits you!
Frequently Asked Questions
How can I make my discord?
Creating your very own community Discord server is easy. Open Discord in your browser or app, click the plus icon on the left side of your screen, then select “Create a server” and enter the name of your new server. Finish creating your account to get started!
How to create a new server?
Choosing the right hardware, installing an operating system, adjusting network settings, installing server software, setting up user accounts, editing permissions, and testing the server are the steps to creating a new server at home.
Can I monetize my Discord server?
You can monetize your Discord server by offering premium features subscriptions and using Discord’s Nitro and Boost options.
What are some useful bots to add to my Discord server?
MEE6, Dyno Bot, Tatsu, Carl-bot, Groovy, and Dank Memer are great bots to add to your Discord server to automate tasks, moderate content, and provide extra features for your users.
How can I maintain a safe and welcoming environment on my Discord server?
Ensure clear rules are in place, moderate content vigilantly, trust your moderators and review/remove user-generated content as necessary to create a channel and maintain a safe and welcoming environment on your Discord server.


